Woodworking Talk banner

Track Saw. Rough cuts or Precision?

1 reading
11K views 33 replies 17 participants last post by  Mad  
#1 ·
I'm wondering about your take on track saws and techniques for using them.

Whenever I make long rips, say all the way down a sheet of plywood, it seems I never get an absolutely straight cut. Maybe I'm putting some deflection on the saw because I'm holding it from the side, but it seems there's always a small curve to my cuts.

I'm wondering about how you use a track saw.

Do you use it for rough cuts only. For instance, you make the cut larger than you need, and then you feed the piece through your table saw for final dimension?

Or do you just get a quality, precise cut the first time with the track saw, and aim for precision through your technique?
 
#2 ·
I don't have a "track" saw and use my 18 volt cordless saw fitted with a fine cutting carbide blade for cutting large panels. I have an aluminum straight edge that is 4" wide and 9' long. It has built in sliding clamps underneath that clamp it to each end of the panel being cut. With this setup, I can cut to size with excellent accuracy. I just take my time and don't rush the cut. I also support the work piece on either side of the cut and at the sides of the panel being cut so the work piece stays flat all during the cut. I have a set of absolutely straight 2x4s that are used to support the panel breakdown. They are clamped together and stand on end in the shop when not in use to maintain their straightness.
 
#3 ·
So I have a festool ts55 and two track pieces.

I have basically a stack of plywood on saw horses with 2x4 supports.

I usually use three full length x 30 inch wide strips of plywood to separate the top piece from the stack of 3 or 4 sheets of ply. This gives me just enough height off the stack to make the cut without cutting the next piece down, and I move two of the three strips of plywood supports to be very near the actual cut line.

I clamp the tracks down at each end.

Maybe my problem is that I'm rushing the cut, and / or putting too much pressure laterally on the saw, allowing the track to bow (or deflect or bend of whathaveyou) a little in the middle.
 
#5 ·
track saws VS saw guides

What is different about a track saw? the base of the saw has a protrusion that fits into a recess on the track, "locking" it in so it can't deviate from the track itself. A saw guide generally requires that the operator maintain constant contact with the edge of the guide in order to get a straight cut.

A hybrid version can be made on your circular saw base using a small strip of metal or plastic, screwed to the bottom, like the track saw. A corresponding recess must be built into the guide so the saw can't deviate from the straight edge. There are You Tubes on DIY track saw that show how it's done:


https://www.youtube.com/results?search_query=DIY+track+saw
 
#8 ·
I don’t own a track saw. I use an aluminum straight edge clamp when cutting a full sheet with my hand held circular saw. Nice straight cuts, easy and economical.
But I know a high quality track saw will give you precision high quality cuts.
 
#9 ·
In general I use my Grizzly tracksaw for rough dimensioning and cut to final size on my tablesaw. I have a two part track that deflects slightly. Measuring, marking and aligning both ends of the track to a rubber strip on the edge of the track all make for possible errors as well.

When I need to get an accurate cut with my tracksaw I do my best aligning the track, then I use a ruler with a stop and run it against the back side of the track and check for consistent distance from the opposite edge of the plywood, and check again, and then hope for the best. Far easier getting a nice straight cut on a tablesaw.


In woodworking there is always more then one way to accomplish something.
 
#12 ·
There are two factors that determine the quality of the cut with a circular saw, the set up and the operator. Your cut will only be as straight as the guide and the better the blade the cleaner the cut. It takes practice and good technique to use a circular saw, you have to be comfortable throughout the cut, jerky actions, etc. will not give good results.

This is where left handed style saws really come into play, most cordless models, you can fasten the guide to the widest part and easily walk along the narrow side to make the cut.
 
#13 ·
One key to using a normal circular saw with any non-track guide is to make sure the edge of the sole plate is parallel to the blade. If it is not, you will get deflection. If it is parallel then you only need to review your technique to avoid deflection. And if it is too far off parallel, even a track won't help...

First thing I do with a new saw is to use the depth rod on my caliper to measure across the wider side of the sole to a marked tooth on the blade, in two places. if the measurement is the same, it is parallel and good to go. If not, you will need to evaluate your saw to see if there is any way to make it parallel (without messing up the angle adjustability). At the worst, you could add a piece of tempered hardboard or even aluminum to the base and make sure it is parallel to the blade. I have returned a couple of saws right after purchase when they are too far off or if the base flexes too much against a guide. And if you happen to drop your saw, recheck to make sure.

As for technique, I clamp my homemade guide for all cuts, and as much as possible try to operate the saw with both hands so I am not pushing it too hard against or away from the guide. My current saw is also very helpful, a Milwaukee, as the handle can be rotated to position my hand either behind or above the saw. By positioning my hand above the saw, it is harder to twist the saw against the direction of cut, thereby allowing the guide to do it's job. I have tried with my hand behind the saw for more reach across a sheet of ply, and messed up the cut every time.

The other point mentioned in posts above is support. Anything from a sheet of foam board on the ground to a full cutting table can be used. Important is to support the plywood close to the cut along it's full length.

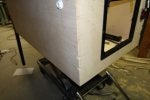
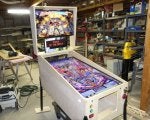
I use a cutting table, followed the plans from Woodsmith for their knock-down cutting table. Supports the sheets completely, and mine is setup so I can just slide plywood from the truck bed right on to the table, make my cuts, then carry the smaller lighter pieces to the shop instead of manhandling full sheets. i posted about it before here, and pics in post # 86 further down.
http://www.woodworkingtalk.com/f27/post-your-favorite-shop-built-tool-jig-fixture-84297/index2/#post877586

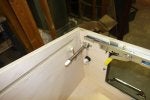
And my guides started as 6" wide strips of good 1/2" thick plywood (ripped on the TS) glued to a sheet of 1/8" tempered hardboard, spaced so that I could run the saw down both sides of the strips and make 3 double-sided guides from one sheet. Then cut one guide into 5' and 3' sections for cross cuts, and put one guide away as a backup. When (not if) I manage to make a ding in the edge of the guide, I can run it along the TS fence with the 1/2" ply face down, only cutting through the 1/2" ply. Then run the saw down the guide to make a fresh clean edge again. Once it gets too narrow it starts to deflect easily, so I break out the backup guide.

With careful measurements and setup, I can get some very accurate cuts with my setup. I actually prefer it to trying to get large sheets up on the tablesaw and guide them along a rip fence. And not having that much room in my shop anyway doesn't help either...
 
#14 ·
Plasma,
There's a festool forum about the tools. I done a search on google and found the common issue is the 2 pc track is hard to keep exact.....almost all there were recommending a 1 pc track for your situation.
 
#15 ·
I’m far from good in the craft but I enjoy it so much. I cut the equivalent of boomerangs with my 5.25 inch 18 volt saw. I bit on the Festool and can’t look back. Using clamps I can rip 8’ sheets, trim doors or even make repetitive rips. It makes me better than I am. I work in a single car garage or outside. Not ready to sell my table saw but it’s hidden away more and more.


Sent from my iPhone using Tapatalk
 
#16 ·
Tim hit the nail on the head. I'll assume that you're using the connectors to join the two rail sections together. I've done the same in the past and while it works, it's not ideal. If you move the track and bump on end, you can be off just a little. Your best bet is to get the FS2700 track. It'll make the long rips in one go and if you need to cross cut, you still have the smaller rails at hand to do so.

From what I've read the festool track saws can ride on a makita rail which is less money. However, I've heard of quite a few of the longer rails from makita that were curved. I'd stick with the festool on that.

I've built quite a few kitchens with my track saw and rarely re-run parts through the table saw. I also stack the ply on my work bench and work my way through the stack using off cuts as a separator from the sheet being cut.
 
#17 ·
I just have a 30 year old B&D circular saw. From the forum I learned how to make a track out of wood and a length of alloy angle. I was able to make a kitchen cabinet with excellent straight edges. I did treat myself to a good quality fine tooth blade. it actually left an almost polished finish.
johnep
 
#18 ·
I have the Festool TS55 track saw and absolutely love it. Finishing cuts for sure even on a 45. The best miters on large pieces of Ply that I have cut. Hopefully pictures of the pinball machine case I built from Maple covered ply will show up. I have 3 lengths of track including one a little over 96" for full sheet cuts. I use 2" stiff foam insulation pieces for the blade to cut into. Also very little dust with a Festool vacuum hook up. I use it whenever I can. And I have a table saw with sliding table extension.
 

Attachments

#19 ·
I have the TS 75 saw with two tracks and have just finished cutting about 15 sheets of 3/4 maple plywood and 1"sycamore MDF for cabinets,a wall of pantry cabinets and two closets..I also use the track to dado the cuts for the top
and toe kick bottoms of my side panels...I have found the connected joint to wiggle a bit.
What I ended up doing is clamped a checked straight piece of 3/4 plywood against the non blade side,and measured all to check
this way i know both tracks line up..
I did find a jig I would have bought b4 this that slips into the track and makes your cut perfectly square..
Kinda pricey but Festool is not cheap and there is a 2nd company making these too.
https://www.festoolproducts.com/ins...RCQARIsACEqIevCDLjiyZpV05PzXQd1sv8REquSQskyyhgfnPgQlItz203iS9MFfBcaAkyYEALw_wcB

 
#20 · (Edited)
Festool is certainly pricey!

Having owned the top of the line FS 75 and all the tracks and MFT table and sold it all, I wouldn't recommend it for the small home shop.

You can make essentially the same concept, not a "guided" saw but a true track saw on the cheap. A "track" saw actually has a track that restrains the saws base from any lateral movement. A guided saw has only a registration edge on one side of the saw base, which the operator must keep in contact for the entire cut ....a big difference.
Here's the DIY track saw:
Image


You will need a table saw or a router and straight edge to make the track. You will need a corresponding width piece of material plastic wood or metal to bolt to the base of your favorite circular saw. The "rail" rides in the track, not on it. Once the track is made, you will run your saw with a fine tooth blade down the length one time on the extra material you allowed for this, creating a zero clearance cut which will prevent splintering to some extent when used on your workpiece.

The Festool system uses all aluminum tracks and bases, but you pay dearly for it. A production shop or a professional cabinetmaker may benefit from the added precision, but it's unlikely a home shop would notice the difference.

Image
 
  • Like
Reactions: gj13us and Catpower
#21 ·
Well you guys are all certainly right about tagging two track pieces together. It can be very wiggly there in the middle. I ended up using a long straight edge to be sure it was straight, then measured at several points before making the cuts. And for the cuts, I used pink foam insulation under and climbed on top of the plywood to stay over the saw. That worked out pretty well, but was a pain.

I think you are correct that a single long piece of track should be used for full length rips like these.

I was very cautious and attentive to how I set up the two track pieces, but here's the true case.

 
#22 ·
First thought - center your rail connector. Also, I can't tell from the video, but I assume you have another connector in the bottom groove as well? If not, there's your problem.

Your current setup has much more play than what I've ever seen with mine.

FWIW - the tracks are not supposed to be touching but be spaced 1/32 apart.
 
#24 ·
The festool rail connectors are tough. Not their greatest product by any means. You've got to get the bolts tight enough they don't slip but not so tight as to dimple the aluminum rail.

If you're going to keep joining the rails and not get a longer rail, I'd recommend making a set of your own connectors. Here's a link to the festool forum where a guy talks about making his own: http://festoolownersgroup.com/festo...-jigs-tool-enhancements/homemade-guide-rail-connectors-(not-your-typical-ones)/
 
#25 ·
#27 ·
I found this thread I made a long while ago when I needed to accurately rip a 10 ft sheet of particle board exactly in half. I use a 2" square by 10 ft long aluminum extrusion as a guide for my circular saw. The title says 4 X 8, but that was not correct:

http://www.woodworkingtalk.com/f27/ripping-4-x-8-sheets-plywood-22041/index2/

Image

I use about the same thing except mine is 1 1/2x 11/2x1/4 angle, just cut up some melamine board for a router table I am building used my PS sidewinder saw with a I think 40 tooth Diablo blade and it cut is perfect
 
#28 ·
I'm also ashamed to admit that it never occurred to me to verify the squareness of the blade to edge of the footplate on the worm drive saw until reading this forum. I've always stored and transported my SkilSaw in the blow molded case it came in to keep it from getting bumped around, but it never dawned on me that it might not be accurate from the factory. I'm not even sure if it is adjustable. It's an older stamped steel foot, not the newer cast aluminum shoe.
 
#29 ·
the festools are top of the line stuff!


the next time you use your track saw, after getting it all clamped down in place - place a pencil mark about mid span at the edge of the track. then as you are making the cut, you can see if it the track that is deflecting.


I would tend to think that you do not need to apply any side pressure using a track saw (assuming the base is captured on the track), and allow the track to control the cut line.


as a contractor, my "track" is a 12" wide piece of 1/2" plywood. I snap a chalk line about 5" from one edge and attach a 1/2 thick x 2" cleat to the ply with one edge on the chalk line. take painstaking effort to make sure it is straight. its used by clamping the jig on both ends of course. the saw rides on the ply with shoe of the saw up against the cleat. the first time you use it, the saw will cut off the edge of the ply. that is now your reference line to line up with the cut line of your job.
 
#30 ·
TimPA's idea has the added benefit of being a 50% zero clearance ONsert, meaning one can rip splintery layered ply bad side down (which removes the headache of reverse layouts for window openings etc) with a hand held skill saw having a blade rotation that forces the teeth to dig upwards. As long as the jig is on the kept half.


Trouble is, materials are so expensive now, I want the edge of the dicard half just as clean, because it will be part of the next piece I cut.