Woodworking Talk banner

salvaged wood table from 100yr+ floor joists

1 reading
8.4K views 18 replies 9 participants last post by  kinghong1970  
#1 ·
Hello,

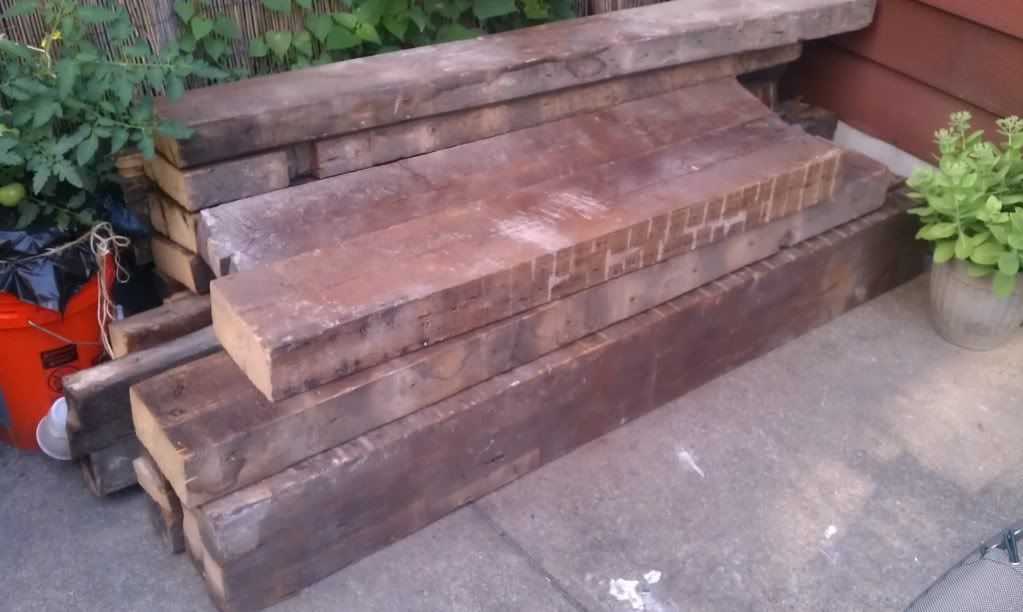
I'd like to build myself a desk out of this amazing floor joists I saved from a near by house demolition, where they removed all the floor joists from a 100yr+ house. This is the wood I have:
Image


The joists range from 3-5" thick, 7-9" wide, and 4-6 ft long.

My plan is rather simple: cut three pieces at 43" which will give me a 27" (I will use pieces which are 9" wide)) by 43" desk. I will then cut three holes in each of those pieces so I can fit a threaded rod through them. I will bolt and glue them together. For the legs I will use black pipes and fittings to complete the "rustic diy look". I need some help with this:

  1. I want to try to save the beautiful colors and imperfections of the wood on the one hand but I also want to have a surface that will be nice to the touch (I'm a student-I will use this table a lot). Is it possible to achieve?
  2. If it is possible to do (to the above question) then how should I do that? a step by step explanation will be much appreciated.
  3. If it isn't possible and I should completely sand it down, then how do I then finish it?
  4. Do you think that it will be hard for me to drill those holes accurately to allow the rod to slide through all the pieces together? If yes, then what else can I do to hold those pieces together without adding to it's size.
Thanks!
 
#2 ·
I'm drooling!

First thing to do is run a metal detector over the wood and get any remaining nails out of the joists.

I recommend sanding or planing them down, if you've ever watched "The New Yankee Workshop" you'll know that reclaimed 100+ year old lumber is gorgeous after it has been planed and finished.

Good luck to ya:thumbsup:
 
#3 ·
I hope once I'm done you will like it as well :icon_smile:

I do not have a planer and nor do I have a metal detector... Therefore, I feel uncomfortable taking it to a lumber yard to plane it for me. I hate to have to pay for a new planer for them. I was thinking about getting a small orbit sander as this is a small project and I could always use it. Will that work?

Also, when you say finish it - can you tell me exactly which steps I need to take from where the wood is now to when it is ready to be used?

Thanks!
 
#4 · (Edited)
First, I'm not an expert on finishing. there are many ways to put a finish on wood, I use the stain and/or polyurethane method.
When I say finish, I mean applying stain and poly, or varnish, shellac, etc.
Before you do that, have your project built and the wood nice and smooth. That's why it's called a finish, it's the last thing you do to it.

If you don't have a planer, you'll have to sand the pieces smooth, a random orbit sander will take forever, if you don't have a belt sander, a cheapo Black and Decker is about $30. Start with the belt sander and fine tune with the random orbit sander.

Do you know anyone that has a metal detector? Any metal that is remaining in the wood will do damage to any woodworking tool (except a hammer) that happens to make contact with the metal. It won't damage a sander, but it will shorten the life of the sandpaper and there's a possibility that it will sand the wood down faster than the metal and leave a slight bump where the nail is.
 
#5 ·
Balance

There are always places of business that do repair and refinishing of antique furniture. You might be able to barter with them for some of the pieces of lumber you have to have them plane down some of the lumber for your project. You might be able to use two planks to hold the table top together in addition to biscuits and glue between the planks; this would be more pleasing to the eye and make the table hold more value for you.

Just a thought.... As we age we start looking for things that reflect the new status we have. I am just thinking this piece of furniture could be part of your life for a long time so long as you notch up how it is put together....

I also think that, on balance, you will want to have heavier legs for this table than pipe; some of the pieces you have might be good legs if they are sawed in half and sanded down.

Hope that helps....
 
#7 ·
There are always places of business that do repair and refinishing of antique furniture. You might be able to barter with them for some of the pieces of lumber you have to have them plane down some of the lumber for your project. You might be able to use two planks to hold the table top together in addition to biscuits and glue between the planks; this would be more pleasing to the eye and make the table hold more value for you.

Just a thought.... As we age we start looking for things that reflect the new status we have. I am just thinking this piece of furniture could be part of your life for a long time so long as you notch up how it is put together....

I also think that, on balance, you will want to have heavier legs for this table than pipe; some of the pieces you have might be good legs if they are sawed in half and sanded down.

Hope that helps....
I am totally with you on the idea of building something that will last. Maybe I should use a 1" steel pipe. I think it will be overkill, the table is quite small if you think about it, but it will it will hold forever. Also, I think I will use bolts to connect the pipe flangs to the table. I thought about using the wood itself to make it look like a "one piece" table but because the wood is so thick, I will have a problem to slide with my legs and computer chair under it. It will be too tight.

Is this the tool I need to use if I want to hand plane it?
Image


If I can't get it planned by a yard that is what I will do.

In terms of the finishing. I am still confused on what should I do to get that rustic look that I like. This is what I want my wood to look like, how do I do that?
Image


I have no clue if I need to wax, stain, sand, seal, finish, and so on... Please help.:blink:
 
#8 ·
Lets go easiest to hardest....

If you are going to use that plane (or one like it) take the blade out and get it sharpened. If you can do it fine otherwise find a good hardware store and have them do it in their service area. They will probably send it out and it will take a few days to come back.

Small planes like that are good for taking off a small amount of wood on a small area. It is difficult (without alot of experience) to have a flat board the size you are talking about come up flat using a plane like that to smooth it out.... Better to start with smooth boards and put them together well than have rough boards and try to plane it out....

I still think you should figure out how to attach wooden legs and make the desk taller. Taller desk means easier to slide your chair under it. My bias is to avoid the black pipe at all costs but it is your table. Remember the pipe can be sharp and will rust so you will need to have something on the ends to keep rust from staining or cutting the carpet/floor..

You will need to clean up the lumber to have edges that will match when you put the boards together to make the table top. I would say that you should use the small hand plane to help you clean up any edges in lieu of just cutting the boards and sanding the edges down so they are perfectly flat.

I would say you are still better off gluing and using biscuits to put this table top together. If you want to get fancier have the head ends of the table each be covered by a piece of wood that runs perpendicular to the main boards of the table top.

If you are going to use lag bolts in the table try to do it so you are not actually putting holes in the table top itself. I would say you will need two or three cross braces under the top so use them as the mount for the legs.

The wood in the examples you showed looked old, was distressed, stained and varnished or covered with polyurethane. No wax please. I would say you should pick out a stain you like (shade and color you like), get a good grade of polyurethane, a good paintbrush, thinner for the stain and poly and go to work. Find a good example of how to stain and seal up a piece of furniture on YouTube...

Hope that helps...
 
#9 ·
Your wood will probably have that rustic look you want when they are sanded, or planed down. Nail holes and maybe some other defects will still be visible, and will add to the character of the piece. Experiment with finishes on a scrap piece of the same material until you get the color you want, and remember to sand with fine grit sandpaper (220 grit maybe) in between coats of finish. This will ensure your finish will turn out smooth, and each coat will have something to hold on to.
 
#10 ·
That's one pretty stack of wood you scored there. I'd love a find like that. I've been looking lately too. I have to agree with an earlier comment, though. Personally, the thought of metal legs seems like it might cheapen the appearance you're going for and make it seem cobbled together. Though I may be wrong. But I think that if you use more of that wood to make legs you'd probably end up with a more impressive piece. Just my opinion.
 
#11 · (Edited)
Agreed


+1 on the above. Have it planed or buy a $200 planer, Ryobi is what I got to use on job sites. Works OK for the price.
The more you get into woodworking you'll find a need for a planer, especially when you can save money by getting those kinds of "deals" the money you spend on the planer is the money you saved sorta thing. :thumbsup: bill
BY all means do not screw pipe legs to that great wood...not appropriate unless you are making a workbench. The table you pictured with the through tenons is exactly what you can/should do...my opinion.
 
#13 ·
Don't get me wrong - I absolutely want to have the legs from the same type of wood but in order to do that I will need to slice the wood in a way which is hard for a rookie and I cannot afford buying a 200$ tool for this. I have a tiny apartment and no room to have an amateur shop (one day, one day) therefore, I am trying to find a solution to make this possible for me to build without going into overly complicated cuts or with buying expensive tools. Pipe legs will allow me to avoid complications and I think it will look pretty neat -
Image
 
#14 · (Edited)
desk?

The table you show is a great example of a work table, large smooth, stable and handsome in a rustic sorta way. Your problem is you can't get there from here with the size wood that you have... too thick, no planer or resaw capacity and you want to retain the weathered/imperfect look on the joists. So, what to do?
You are wanting a desk/table 43" long. Without reducing the thicknesses, 3" and greater, that you have, you will have to use a common or uniform thickness to avoid changes in dimension either on top or underneath.

The process of drilling holes through that thickness accurately enough to have the pieces line up is a bit beyond your capability without a shop. You can drill oversize holes with enough "slop" to allow alignment. They must still be perpendicular to the edge and deep, in your case 7". Not easy to do without a drill press or drilling jig. So, that may not be possible. FYI... edge glued stock properly jointed will be as strong as the wood itself, but again you don't have that capability.

The only option I see here to get the desired results and utilize the wood in a conservatory manner is to seek out a fully equipped shop, supply them with a drawing and be on site to advise the work in progress. If you just want a few boards edge jointed and planed to a uniform thickness for the top surface that will make the task much easier. Probably less than an hour of shop time. Some shops will not run any wood with the possibilty of metal/nails through their equipment, and I don't blame them. A careful inspection and the use of a metal detector as suggested may be the only way.
They may also have a thicknessing/wide belt sander. A nail will not ruin a sanding belt like it will a planer blade.

You may find a "friendly" shop owner willing to do that basic milling for you at a reasonable charge. If they hit a nail and ruin the planer blades, the cost will go up considerably.

The other option is to plane and joint the boards by hand and that is a skill not readily acquired. Best of luck to you here. ;) bill
 
#16 ·
The table you show is a great example of a work table, large smooth, stable and handsome in a rustic sorta way. Your problem is you can't get there from here with the size wood that you have... too thick, no planer or resaw capacity and you want to retain the weathered/imperfect look on the joists. So, what to do?
You are wanting a desk/table 43" long. Without reducing the thicknesses, 3" and greater, that you have, you will have to use a common or uniform thickness to avoid changes in dimension either on top or underneath.
The process of drilling holes through that thickness accurately enough to have the pieces line up is a bit beyond your capability without a shop. You can drill oversize holes with enough "slop" to allow alignment. They must still be perpendicular to the edge and deep, in your case 7". Not easy to do without a drill press or drilling jig. So, that may not be possible. FYI... edge glued stock properly jointed will be as strong as the wood itself, but again you don't have that capability.

The only option I see here to get the desired results and utilize the wood in a conservatory manner is to seek out a fully equipped shop, supply them with a drawing and be on site to advise the work in progress. If you just want a few boards edge jointed and planed to a uniform thickness for the top surface that will make the task much easier. Probably less than an hour of shop time. Some shops will not run any wood with the possibilty of metal/nails through their equipment, and I don't blame them. A careful inspection and the use of a metal detector as suggested may be the only way.

You may find a "friendly" shop owner willing to do that basic milling for you at a reasonable charge. If they hit a nail and ruin the planer blades, the cost will go up considerably.

The other option is to plane and joint the boards by hand and that is a skill not readily acquired. Best of luck to you here. ;) bill
All good points. I appreciate it.

Drilling through it, to hold them together, I decided to forgo. It will be too hard to do with my limited skills and tools. I will only glue them together. Maybe I will use a metal brace on the sides which will require minimal work and skill.

I will try to find a nice shop that will plane it for me. If I can't find any - I will just use a belt or orbital hand sander (I can't afford buying both) to sand it down. I thought about maybe sanding the pieces after I glue them together which will make it easier for me to level.. What do you think?

Once I get it sanded, either by using a planer or sanding it myself, I will stain it and poly it? that is it?

Thanks
 
#15 ·
I must confess; the example picture you posted wold be more stable than I had envisioned from your description. I thought about it last night and was going to suggest that if you do go with the pipe idea you need to at least find a way to brace the legs to each other at least a 1/3 of the way down from the top. Otherwise, the table will likely be wobbly and unstable. That picture is exactly the sort of thing you'd need to do.
 
#19 ·
congrats on your find...

a couple of years ago, we renovated a building in SoHo NYC that was built in 1873 and due to the condition of the joists, we had to replace them with I beams...

the wood we salvaged from the original flooring looked bad but after some hours of work, it was amazing...

the largest piece was used to create a 30' solid bench for the customers to sit while buying ridiculously expensive shoes... we've had countless offers by folks who wanted to buy out the reclaimed lumber...

which brings me to another question...
what is the best way to store reclaimed lumber for extended periods of time (3~6 months)?