Woodworking Talk banner

Plywood joinery

5.7K views 33 replies 14 participants last post by  woodnthings  
#1 ·
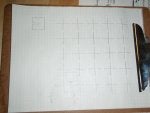
I have an idea for a king bed made from a frame of 15in plywood cubes, sandwiching 3 plywood "floortimber" type crossmembers, with two rows of these cubes on either side, and a row of cubes at the foot of the bed.

I'm trying to think about the joinery to be used on the 15in plywood boxes. I imagined finger joints, but research indicates this is a bad idea. I would like to optimize for ease of technique for a carpenter with limited tools, and allowing for extra tolerance, while maximizing structural integrity.

Alternatively, I could send this out to be laser cut.

What joints should I use to make the boxes?

Alternatively, this easily be less expensive for me to outsource this to an appropriate shop.

Thanks!
 
#3 · (Edited)
welcome to the forum, Brad.
what part of the country are you in ?
a simple sketch or drawing would put us all on the same page
as you in your thought process.
this would get you the most accurate responses for your concerns.

like Bob said: they will not be seen I would just glue and nail them
together. I've seen waterbeds with very similar (interlocking) support frames.
(you might want to google that)

.
 
#4 ·
Why use cubes?

Cubes are 6 sided and will not show when covered. Why not make a frame that will give great support and even be a "take down" for moving about? Make a grid of 3/4" plywood using "cross joints" that "lock" together when assembled. This is video shows a smaller scale than you would use for a bed frame which would be high enough for sitting.


Your frame can be covered with a sheet(s) of 3/4" plywood to make a smooth support for any type of mattress ..... water, air, foam etc.
:vs_cool:
 
#5 ·
For us, the undersides of beds provide a large volume of valuable storage. They offer easy access, too. We use the space for seasonal items, like summer/winter bedding and holiday decorations. Our children used them for closet overflow when they were younger.

We use shallow boxes and trays with rollers/wheels to make access easy.

That space is too valuable to block off (pun intended).
 
#6 · (Edited)
Thanks for all the interest! I'm in Southern California. A king mattress is nearly square: 15 inches times 5 boxes per side, make a roughly 80x80 frame (lotsa fudgefactor in here still, but we're not at that step yet) I'm still just trying to get the general concept in mind.

It is correct that If you build the whole platform from boxes, that the inner ones are pretty useless. Also, the headboard will be against the wall, so those boxes won't be seen/used either. My idea was to build boxes around the outside, with crossmembers to hold up the middle, like:

Image


(Yellow=side boxes, red=end boxes, blue=crossbrace)

These would be 5 sided boxes (one open face) and the size would be about right for each box to hold one of these or like a milk crate.

Image


The boxes would be bolted together, not glued, so that when the frame is disassembled the boxes double as crates.
 
#7 ·
Crates? ... OK, then .....

Why not use milk crates? Not actual ones, but the type found at Target, Home Depot etc, for misc. storage. College students use them for many things, but maybe never a bed support.... who knows? Cheap, already made, available and open on the top for storage.


:smile2:
 
#10 ·
#9 ·
I can see what you are trying to do, but from a manufacturing perspective it just does not work. Board products, and especially veneer construction plywood, are not suited for corner fabrication--particularly with constraints on equipment. I've seen stuff like this made out of mdf or similar composite boards in plants that really know how to use double end tenoners, but it ends up being high end furniture by the time all is said and done. You could probably engineer a structure like you have drawn to work with heavy cardboard boxes, which were not something I ever had to design, rather than any type of wood material a carpenter would be familiar with.
 
#15 ·
I would use zip ties.


Zip ties are very strong, cheap, and easily removed if the need arises by cutting them ...... scissors, knife, or side cutters. If they can hold records, they will hold just about anything. If you don't like the open look, use a plywood panel as a surround. You can leave open "gaps" between them for storage of longer stuff, golf clubs, picks and shovels,

tennis rackets, etc. and they will still easily support all the weight if you use a plywood top cover.


Is this for a water bed?
 
#12 ·
My home-made waterbed base and frame used "2x4" and "2x3" frames (some with ply infills); ply bed base, and "2x8" sides topped with "2x3" (its actually all metric lumber, I did this in Scotland decades ago). Its been moved a few times and put in storage once. It includes 3 large under-bed drawers each side - which have been invaluable fro storing things like camping clothes, ski clothes, scuba stuff.

Its always about storage.
 
#13 ·
How often are you planning to move?
With the amount of material you need to buy to make that bed you could save enough on a conventional design to pay for any amount of cardboard boxes when you did want to move. Let alone the hours and hours (make that days) required to make it.
Also, 15" high base is a very low bed base unless you are young and agile.

Not all "good ideas" translate into real life, I'm afraid this is one one of those.
 
#14 · (Edited)
Back to Original Question

Simple butt joints, either nailed or screwed would be more than strong enough for what you are doing.
The problem would be an aesthetic one - the edges of the plywood exposed. If this is what you want to do, then automobile or woodworkers Bondo will smooth out the rough edges to where they can be painted. If you have the ability to miter the corners, that would solve the 'edge' problem. The miter joints will not be as strong butt joints, but they should still be able to get what you want. A vertical load using boxes should hold up the Empire State Building. (Figure of speech - don't want to get the engineers riled up)
If you are going to put liner boxes inside for storage purposes, I would make the inside of the boxes approx 1/2 larger than the liners. that way they wont jam when you tip the boxes upside down to get the liner out.
Have you thought about not even using a box inside the boxes? Plywood makes a good liner for clothing items.

Here is another idea about the boxes to resolve the 'edge' problem. You get or make 3/4" square sticks. Nail the sticks to the plywood edges and that will hide it. If you wanted to get creative, you could use 1" square sticks and the vertical edges can be left proud of the surface. If you are going to paint the boxes, maybe paint the vertical sticks a contrasting color.

Just remember to post photos of progress and the finished product

Good luck and have fun in whatever you choose.
 
#16 ·
For a load bearing base a cheaper, easier, faster design would be to build Xs that slot into each other. It'll take half the material, it requires no mitre cuts, it assembles and dis-assembles without tools and if you slice the top plywood that goes over it all into two or three sections it should all fit in a Volkswagon Rabbit (I fit a homemade water bed into mine in College with all the doors and hatch closed). Each X in the picture replaces a box but takes two pieces of plywood instead of 5. If you need storage the baskets will still fit between the Xs under the bed. If you have a router you could take the plywood that goes over the Xs and route channels into it that the top of the Xs would sit in, that would ensure they don't move during sex.
 

Attachments

#18 ·
If painted, how about MDF? I even clear coated MDF and it looked pretty good. (not my style) Attaching them together, could use sex bolts.

TonyB may be able to explain this better: I understand this is a totally different direction but...the queen bed in the RV I used to have was a plywood sheet that the mattress sat on. Under that plywood sheet was a big box about 5' X 7' about 16" high. The bed was basically on a hing and gas "springs" where you lifted the whole thing up to access the storage.
 
#21 ·
...................... Why is everyone trying to head me off at the pass?
Because that is what we do. LOL Just a bunch of old guys killing time and having fun.
FWIW, Some people on here actually go a whole different direction after reading all the replies. Not often, but sometimes. Others just slash their wrists.

I like your design and I know you will have fun building it.

Post lots of pics.
 
#23 ·
Stopping him before he ......


Some of the suggestions are alternate paths to achieve the same result with, less cost and much less work. It is up to the OP to take the advice or to stay on the path he has chosen. We have attempted to "head him off at the pass" before he gets too far down the bumpy trail and may get ambushed. Yep, old guys havin' fun also ....... >:)
 
#25 · (Edited)
Aaaaaaaall righty then! I found these "S-Crates" from https://www.milkcratesdirect.com/super-crates/s-crate-1
Trouble is, they cost more to ship than they do to buy. But weirdly, "Walmart.com" offered free FedEx shipping. Of 20 completely un nestable crates. They were clearly just drop shipped from the above website, since they came by air from DE! (I'm in SoCal). Very weird, but I'm not complaining. Picked up a couple 8ft sheets of 1/2in MDF and some pine boards. Sleeping on the mock-up tonight, took 20 minutes to assemble, feels very solid. That was a TON of work saved [woodnthings]. Thanks! Will post pix when I put it together tomorrow!
 
#31 ·
@Tool Agnostic

Very informative!

Note; the Rockler miter fold set doesn't work because it's larger than 8" - I read that you can't even get it to work with bypassing cause sawstop basically can't "see" it at all.

Kinda the same sizing problem with the molding knife head I want - http://corobcutters.com/accessories.aspx -- it's only 7" so my understanding is it wouldn't work :crying2:
Molding heads are not compatible with SawStop saws.

I tend to focus a lot on safety. I like the "insurance" that the SawStop safety mechanism provides. I am willing to live with its limitations (no molding heads, no 6 inch dado sets, etc.). To be honest, the limitations have never held me back, and I recommend SawStop saws to others. Despite the safety feature, I still use the SawStop saw the same as any other table saw - with the best safety practices I know. Other than demos, I have never triggered a SawStop brake, and hope I never do.

I have never used molding heads, but be aware that they can be very dangerous; one of the most dangerous things you can do with a table saw. I know more than one woodworker who has told me that the scariest tool in their shop is the molding head. Many refuse to use them. As a "newbe", be sure you do all of your safety homework before you move on to molding heads.