Woodworking Talk banner

How to cut this dining table leg?

2 reading
15K views 16 replies 6 participants last post by  tylerdru90  
#1 ·
OK experts I am going to be starting on my next project soon and need some help with this design. Posted the picture below

I plan to make these legs by laminating 3/4 wood together, routing the curves by template, and adding the mitered trim.

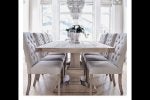
You can see in the picture that is how they did it as well (I think) ...The curves I can cut with the router template before laminating are the very bottom part and the middle part facing the camera BUT how can I cut the curves on the left and right side of the legs towards the bottom and middle?? The router bit is not long enough to curve the say 6" wide board.
 

Attachments

#2 ·
There are a number of different ways that could have been done. Before machinery the contour could have been cut with hand chisels. Later furniture manufacturers had really big bandsaws it could have been cut out and sanded. That one was probably cut with a CNC. The DIY could machine most of the wood away with a router using a cradle and sanded with a spindle sander. I don't care for the way that one has a band across the middle with grain running perpendicular to the post. If it's just trim when the post shrinks gaps will appear between the molding and the post. If it's a separate piece of wood that goes through the middle the post would have to be mortised or doweled to the post which in time could split the post.
 
#3 ·
#4 ·
Gotcha, You guys would do it the right way with all the tenons but for someone like myself it might be somewhat difficult. I don't have a band saw that big either. I guess I could live with the gaps. If that's the worst- I would consider it not too bad for my first table. I am thinking I could cut most of the curve on the table saw by ripping down the edge and then flipping it over to rip the other edge. Probably have inch or two I could then cut with a hand saw. And then cross cut a 25 degree angle to start the curve and sand it out. What do you think?

Pretty cool legs you cut there. That band saw must be pretty nice
 
#5 ·
Aaronhl,
The picture of the table leg you show can be made using 4 2x8's mitered with tight corners.
Not a job for a table saw at all after the 8 corners are all fitted.
The decorative design is cut next. You can use a bandsaw for this. Your width is too big to use a sabe saw, hand saw or other type in my opinion.
When design is cut and sides assembled, it will look like one big block of wood.
 
#6 ·
I see 3 different pieces there. The base, the leg that sits on the base, and the trim around the leg. You've already figured out how to laminate the base together. The cove in the bottom of the leg can be cut on a table saw (angled fence). To get upper part of the leg shaped without a large bandsaw, I see a lot of handwork in your future. The trim ring around the leg is just 4 pieces and it looks to be dropped onto the leg after the fact. There's also likely another piece not shown for connecting the leg to the table itself but that will be easy compared to the rest of it.
 
#7 ·
I think I am going to try cutting that top curve by cross cutting and angling the blade on the table saw. From there I can sand the the curve smooth.

So are these bases usually 2 x 8"? Just getting an idea for the wood I'll need.

How should it be mounted to the top?

Thanks for the help everyone
 
#8 ·
with all due respect ...

I have 50 years of woodworking experience and I would not consider this an easy project. I could do it on my 18" bandsaw, but it would require a large chunk of wood, a glue up. Also a pretty accurate pattern to layout all the shapes, mirror image right and left to get it symmetrical. You would have to support the piece with the cut offs to maintain a level cutting surface.

I think you may be over your skill level here based on the questions you've asked and certainly you do not have the machines necessary.
Yes, you can make cove cuts by angling the fence on the table saw, not the blade, easy enough but not a beginner level operation. It will take lots of trial an error to get the cove just right. Then you have to create the opposite or positive shape somehow ....:surprise2:

I'm not saying you can't or shouldn't try, just that it won't be easy.
 
#9 ·
I make a leg like this hollow in the center. I use a combination of router cuts and bandsaw cuts to make the design. I've made them both square and octagon and they've lasted 40 years. Why would you want to glue-up a big sold chunk of wood? It will only add about 30 pounds of weight to the total project which will be heavy even with hollow legs.
At the top of the leg or pedestal I screw a flat 3/4" or 1' board. This board is longer than the leg and gives you the base to screw the leg to the underside of the table.
It's not necessary to use 2" lumber, but anything less than 1 1/2" thick limits your overall design.
 
#10 · (Edited)
the hollow center?

I make a leg like this hollow in the center. I use a combination of router cuts and bandsaw cuts to make the design. I've made them both square and octagon and they've lasted 40 years. Why would you want to glue-up a big sold chunk of wood? It will only add about 30 pounds of weight to the total project which will be heavy even with hollow legs.
At the top of the leg or pedestal I screw a flat 3/4" or 1' board. This board is longer than the leg and gives you the base to screw the leg to the underside of the table.
It's not necessary to use 2" lumber, but anything less than 1 1/2" thick limits your overall design.
Your method with a hollow center would save 30 lbs of weight? Really? A 4" square piece of wood 3 ft long, the equivalent of the hollow, will not weigh 30 lbs. It would also be a nightmare to make the glue ups with curved pieces and holding them without having them slip around with miters on the corners? What ever you say ....:|
 
#11 ·
Yes on first thought it seemed like a project that isn't too bad but up for a challenge because we need a bigger dining room table and since I have a nice shop in the basement I figure i'd give it a try. My gf might want it painted anyway so I can cover the bad areas.

I am pretty sure I can cut everything except for the curves we've discussed, so that part may be trial and error. We like the complex curve design so I am going to give it a try. I should post a picture of the workshop bench I just made too
 
#12 ·
If it were me, I'd do a solid glue up. The base is one area where you want weight and strength. The "trim" band around the base can also be made on the table saw. Plan to spend some time on the saw but it is doable. I see the trim as two pieces - the large bullnose and a relatively thin backband. For the bullnose, take a piece of material the thickness and width you need and make it long enough to get 5 pieces from to wrap around the middle of the leg. 5 pieces because it's real easy to make an extra piece right now and a lot harder to do so later. Gives you a spare....

Anyways, square up the ends on your bullnose piece then draw the radius you wish to achieve on there. At that point, set the piece on the far side of your saw blade and tilt the saw until its cutting near the radius line. Keep tilting and cutting. You may need to have the back of the piece to your fence or maybe you have the face of the piece down on the table. Depends on the angles you can cut. Since you have a symmetrical bullnose, make one cut, spin the board, and cut the opposite side before moving the bevel and fence. This isn't a quick process but it will get you real close. Once your close, you can knock off some of the remaining ridges with a block plane. At that point, you can blend everything with some 80 grit sandpaper.

To do this you'll need an outfeed table that is exactly in line with your table saw top. If the outfeed table rises or falls, it will affect your cut.
 
#14 ·
Let me clarify what I plan on doing...I am going to cut the pieces first and then laminate all of them together. It will not be made with a solid block or cut after it has been glued.

You can see the glue lines in the original picture. I will sand and level any parts that were glued up wrong.
 
#15 ·
To make the leg, I would use a 2 X 8" for each of the 4 sides. I don't recommend gluing up each side from narrow pieces because this will only add work and slow your total process.
Each piece must me absolutely square and matched length and width.
Do you have a router table? Does your router table top have a groove for a miter gauge?
If not, you will have to make a simple jig to control your router cuts.
Your primary router bits will probably be a large and a small cove bit.
Very large coves can be cut on your table saw.
Once your design is drawn out, as you jig up for each cut, cut all 8 boards with each set-up. (4 per leg).
On a 2" thick board, your design should not exceed 1 1/2" depth at any point.
Once cut and sanded, the 4 pieces can be glued and clamped with band clamps.
 
#16 ·
Very helpful, this is why I like wood working because there are so many different ways for the "same" cut.

I can picture using my router table and gluing the 4 sides together. Seems like the best way with the cove bit on the four 2x12s, but as someone else said might be hard to glue them up straight. Might be the best way to go for me though

Still thinking and preparing !!