Woodworking Talk banner

Dowel making jig for router table

48K views 24 replies 14 participants last post by  Phaedrus  
#1 ·
Some of you showed an interest in my dowel making jig that I made while making my wooden bucket truck. As promised, I'll try and go through the steps that it takes to make your own and hopefully, I will be able to explain it well enough that you guys will understand my twisted logic. If there are any questions, feel free to ask and I will try and clarify it.

For my jig, I use a 1/2" straight bit in the router table. You can use whatever size of straight bit that you like, but you will have to adjust your hole sizes in your jig accordingly.


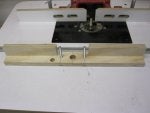
I made an 18" long fence that is approximately 2" high. Be sure that the fence that you make is square. You don't have to make this in the form of a fence if you don't want to. A flat board will work just fine, but I wanted to clamp mine to my existing router table fence instead of clamping it to the table. Whatever method you choose, you will need to drill a centered, 3/4" through hole for the router bit to protrude from. The hole that you see on the left of that centered hole, is one that I drilled as an access hole for my router lift system. I also turned a little cover for this hole so that it would not fill up with chips while using the jig.


I then had to cut a couple of shallow dadoes in the bottom of the jig, to accept the T-bolts that I will be using to hold my dowel cutting blocks in place. Again, you don't have to go this route. You could use wing nuts or whatever you have on hand. I used these T-nuts because I have a stock of jig hardware that was crying to be used.


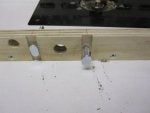
Now that your fence is done, you need to make your dowel cutting blocks. I made mine 4" X 1 7/8" X 1 5/8" but you can make yours whatever size fits your particular jig. You want to make these blocks out of hard wood, as they will take some serious abuse. I made mine out of hard maple. Once you have your block cut, you want to mark a center line all the way around the block. In this case, the line is at 2" on every side.


At this point, you need to drill 3 holes. 2, that will line up with your T-bolts for fastening the blocks in place, and a 5/8" hole in the bottom that will accept your straight bit. The hole for the straight bit is only drilled to 1/2 way into the dowel cutting block. Give yourself a little extra play in the T-bolt holes as this will give you a little more flexibility for fine adjustments, should your cuts be a little off.
 
#2 ·
You now have a decision to make. What size dowels do you want to make, and what size stock do you want to make them out of. You will need to make one dowel cutting block for each size of dowel that you wish to make. I like things to be easy, so for the smaller size dowels, I decided that I would like them all to be cut from 3/8" stock and for the larger size dowels, I decided on 5/8" stock. I make mine out of scraps and off cuts so knowing right off the bat what size stock you need is a real time saver and avoids mistakes as well. The entry hole that you now need to drill, is determined by your stock size. Cut a piece of stock square and measure from corner to corner as I'm showing here.


This measurement will be the size of your entry hole that will be drilled in the front face of your dowel cutting block. The hole will only be drill to 1/2 the thickness of the block. (I only had finished blocks when I took the tutorial pictures guys. The hole that you see going right through is the exit hole. Sorry if that confused any of you) I use a forstner bit for all of the holes in the dowel block (except the ones for the T-bolts) to get a clean flat bottomed hole.


You then want to drill your exit hole. The size of the exit hole will be the same size as the dowel that you wish to be cutting. For example, this particular block is for cutting 3/8" dowels. The entry hole is 7/8" which is the measurement, corner to corner on a 5/8 X 5/8 stock and the exit hole is 3/8, which is the size of the dowel that this block will make. It is important that you are careful during this stage of the drilling. The holes must line up perfectly and they must meet in the center of the block. The hole for your router bit will also meet up with these holes in the middle of the block.


I marked the size of the dowel, and the size of stock on the bottom of each block for easy reference. I think that I will be burning these measurements in and burning the center lines in for a more permanent marking. This is the bottom hole for the router bit that we are looking at. You can see in this photo how the entry and exit hole meet in the middle. This is very imortant for stock support while the jig is being used. You don't want very much play when feeding your stock as it can cause variances in your sizes of dowel.


Now you want to set the height of your router bit. With the block in place and secured on your fence, you want to set the height of your bit to be level with the bottom of the exit hole in your dowel cutting block.
 
#3 ·
Your jig is now ready to take for a test flight. Clamp the jig to your router table in whatever configuration that you choose and make sure that your bit is pretty much centered in the entry hole in the bottom of the jig.


Then take your piece of stock (in this case 5/8X5/8) and, with the router running, slowly insert the stock into your jig while continuously rotating it. The purpose here, is to round a small section of the end so that we can chuck this blank up in a cordless drill. For the smaller size dowels, we can avoid this step as 3/8 X 3/8 stock will already fit into a 1/2 chuck on a cordless drill.


Once the blank is chucked up, run the drill at full speed and push it through the jig until an inch or two is protruding out of the exit hole. At this point, you want to check your thickness of the dowel. If the dowel is too small, you need to lower your bit a touch. If your dowel is too big, it will most likely not fit through the exit hole and you will need to raise your bit a touch. I found that once I got the size the way I like it, a little paste wax to coat the exit hole goes a long way to not burning your dowels.


I was able to fine tune this jig within minutes and was able to make perfect 3/8, 1/2, 1/4 and 3/16 dowels out of maple, walnut and oak with no variation is size whatsover. If you are not getting the results that you want, don't give up. Play with the jig and adjust your drill speed and feed rate. I ran the drill at full speed with a medium feed rate. Feeding it too fast, cuts ripples in the dowels.


The length and the size of the dowels are only limited by how many blocks you cut and by how long you cut your stock. I will continue to add blocks to this jig as the need for different sized dowels becomes necessary. Try this jig out guys, you'll be glad you did. :thumbsup:
The dowels from the big box stores are crap and often under sized. I finally have perfectly sized, hardwood dowels in a species of my choice and the best part is that they are made out of scrap. Good luck.


If you have any questions at all guys, feel free to ask.
 
#7 ·
why?

Kenbo, why didn't you make the hole parallel to the fence to allow for any length dowel you may want. If I understand your concept you are limited by the back of the fence, red housing in the photo by having it 90 degrees to the fence..... maybe I don't get it? :blink: bill
 
  • Like
Reactions: Kenbo
#8 ·
Kenbo, why didn't you make the hole parallel to the fence to allow for any length dowel you may want. If I understand your concept you are limited by the back of the fence, red housing in the photo by having it 90 degrees to the fence..... maybe I don't get it? :blink: bill

Good question Bill. When I built my jig, I built it so that my outfeed hole lines up with the dust collection hole in my fence. Most of the dowel pieces that I make are only 12"-24" long and even with the dust collection hose in place, the feed out through the d/c port just fine. If I have to make a longer dowel than that, I can just remove the hose from the back. Either way, There are no limitations with the length due to the allignment with the d/c port. Thanks for asking though. I appreciate the input.
 
#9 ·
I knew I was missin' somethin'

I can count on you to figure it out. :laughing: bill
 
  • Like
Reactions: Kenbo
#10 ·
I can count on you to figure it out. :laughing: bill

The smaller d/c hose for the fence is just a minor one. My main d/c for the router table is a 4" port that is in the back of the cabinet. So if need be, the smaller one isn't really needed at all. You should make your parallel version and post it Bill. I'd be interested to see what you come up with.
:yes:
 
#14 ·
Ken,

I have the pinnacle RF3 Fence, all 36" of big ass hotness. This setup wont work for me, BUT, I think this weekend Im gonna change the layout a bit, and see what we see. Ive been forced to close the door to the shop this week and rest my arms, so I havent had the chance to do it yet.
 
#18 ·
I'm not so sure what kind of mods you will need to make it work. You will just need a 1 1/2" exit hole out the back of the jig block and you will have to figure out the diameter of the entry hole by measuring your blank corner to corner. Other than that, the jig will work the same. Remember, that I built mine to attach to my fence but you guys can eliminate the backer board, elongate the bottom board and make the jig to clamp to your table. It works the same way.
 
#23 ·
Thanks for the tip! I tried it today. Worked pretty good. Is the trick to go slow? The first part of the dowel looks like doo but I started to get the hand of it at the end.
View attachment 64132
It does take some practice to learn the speed which you push the dowel through. If you go too fast, the dowel is almost "spiralled". You will have to experiment on the speed. Congrats on trying the jig. It really is an awesome one and you will never buy big box store dowels again. (at least for the smaller sizes)
 
#22 ·
Great video supplement to your build tutorial.

Bookmarked!

Thanks Ken.

Oh yeah, I was wondering about drill speed too. High? Low?
 
#25 ·
Ken,

I am thinking about building a dowel making jig similar to this. How precisely sized does your input stock need to be? My TS fence is, well, *^%$ and getting precisely sized cuts in a repeatable manner is tricky. Also, is there a benefit to cutting with the top of the bit versus the side edge (other than less directional force pushing or pulling the stock)?

Thanks!