Woodworking Talk banner

Router Sled

1 reading
4.5K views 82 replies 11 participants last post by  Rebelwork  
#1 · (Edited by Moderator)
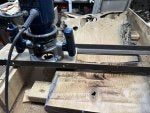
Getting ready to flatten a slab. Its close. It was flattened a year ago and cupped a bit.

I am making a router sled to do this with a 2” planing bit

I have the slab on the bench. I put a piece of ply, 6” tall, on each side and secured them, level and straight with each other.

the slab goes in the middle. I will screw a 2x4 under each side from the bottom, shim it level and fasten it to the bench.

At that point, all is straight and secure.

For the sled to ride on top of the ply, 3/4 stock seems solid. But this is about 1/2 above the slab. Plus the router will be mounted on the sled. So, the router shaft is not very deep into the router. Its a 1/4 shaft.

questions are
1) will this be ok or does that create too much room for movement
2) does it matter if i use my full size router (still 1/4 and an inexpensive Ryobi) or a smaller trimmer (also inexpensive from Harbor Freight)
Image
Image
Image
 
#3 ·
I am making a router sled to do this with a 2” planing bit
) does it matter if i use my full size router (still 1/4 and an inexpensive Ryobi) or a smaller trimmer (also inexpensive from Harbor Freight)
Do you have that bit at this point?
I ask because that's a very large bit for a 1/4" shank!
A trim router or even a full size 1 HP router will struggle with a depth of cut much more than 1/32" and especially with a 2" diameter cutter.
I recommend that you upgrade your router stable with a 1 3/4HP or 2 1/4" HP router if your are serious about woodworking.
We all have more than one or two routers having been in the craft for a few years.
Some of us have more than 10 ...heh , heh.....?
A router table should have around a 2 HP router, mine are 3 .25 HP.
I have the slab on the bench. I put a piece of ply, 6” tall, on each side and secured them, level and straight with each other.
The sides of this setup seem a bit too tall for flattening. JMO.
Some sleds I've seen use 1/8" angle as the support tracks, to minimize the height above from the slab:
 
#4 ·
Do you have that bit at this point?
I ask because that's a very large bit for a 1/4" shank!
A trim router or even a full size 1 HP router will struggle with a depth of cut much more than 1/32" and especially with a 2" diameter cutter.
I recommend that you upgrade your router stable with a 1 3/4HP or 2 1/4" HP router if your are serious about woodworking.
We all have more than one or two routers having been in the craft for a few years.
Some of us have more than 10 ...heh , heh.....?
A router table should have around a 2 HP router, mine are 3 .25 HP.

The sides of this setup seem a bit too tall for flattening. JMO.
Some sleds I've seen use 1/8" angle as the support tracks, to minimize the height above from the slab:
Yes i have the bit. I got it on amazon a while ago. Not sure why i got the 1/4. Maybe my router cant accept 1/2 and i just forgot. Will check later. but if i did go for a more powerful router, i guess id get the 1/2 bit as well.

but as for the height of the sled, its 6 inches tall, but the slab i am working on is 4” tall. The distance from the top of the sled rail to the workpiece (of course variable with shimming) is only about 5/8”

but the 5/8, plus the 3/4 of the sliding part, plus the amount the bit recesses into the router all adds up

maybe the answer is metal angle iron like in the video
 
#5 ·
At 4" that's a very thick slab. I'd remove equal amounts from both sides to help mitigate further warping.
You can try the setup you have, but it's not optimal. Make certain your bit is fully inserted into the collet, then pulled out 1/16"at most.
Check the collet often or at any signs of vibration. Good luck with this!
 
#6 ·
That’s asking way too much of a compact router. I think you’re risking burning up your router. I used a 1 1/2” bit in a 3HP router and had to give it a cool down break. Course I was hogging off 1/8’ hard pine. You can pick up a 2HP or bigger at a pawn shop or FB marketplace.

That 3/4 support is not stout enough. It’s gonna flex as you slide it. I suggest you make a 3 sided box with plywood and a slot.
 
#7 · (Edited)
I was thinking about a three sided box. Although i like the angle iron. I have a bunch of it from bed frames. Last time I tried to cut and drill it, it wasnt fun but maybe Ill give that a shot.

But that still leaves the shaft pretty long. I guess if it were 1/2 it wouldnt really matter (as much)

i dont need to take much off (i dont think) so will be able to make a bunch of passes where i just skim it… 1/32? And since its just this one project, i can take my time and give plentynof cooling

So the small router is out, the 3 sided box / or angle iron is in. The question then is, if going slow and careful, can the 1/4 shaft and 1.75 router handle it, or is the upgrade a necessity?
 
#10 ·
I use the compact router below with a 1/4 shank surface bit that has a 1 inch cutting diameter. It gets the job done, but it does use up the 5AH batteries pretty quick when removing more than a 1/16. If you're willing to spend more money to get a more powerful router, and a bigger bit, I would highly recommend it.

As for your concern about the distance from the base of the router to the workpiece, I too went with angle iron. Just make sure the pieces you get are nice and straight. Also, You can use other pieces of a material that you know is nice and flat as spacers to raise up your workpiece. If the piece is small enough and/or if the surface is slippery enough, the piece will move on you as you flatten which is annoying but could also through off the reference points. To address that, I recommend using several 1 inch beads of hot glue in the corners where the piece meets the surface it's resting on to keep it secure.


#13 ·
I went with the angle iron. Its straight and solid like it should be.
Instead of the round plastic base plate that comes with the router a rectangular one is generally used for stability and a smoother cut. A plate from a router table can be used, or you can make one from 1/2" BB ply etc.
 
#18 ·
That's a nice X -Y vise on the drill press table!
 
  • Like
Reactions: Bob Bengal
#21 ·
Im overlapping about 1/2. One thing I didnt do is secure the sled so it may have moved.
But… regardless of anything else, it is physically impossible to cut below a certain depth… right? Even if the overlap wasnt big enough or im burning, how can it not be flat?
 
#22 ·
Im overlapping about 1/2. One thing I didnt do is secure the sled so it may have moved.
But… regardless of anything else, it is physically impossible to cut below a certain depth… right? Even if the overlap wasnt big enough or im burning, how can it not be flat?
Only if the bit walks itself out of the collet will it cut deeper, assuming everything else is stable:
No sag in the sled itself from the weight or down pressure as it's run across the rails?
No difference in the height of the rails from side to side or from end to end?
No movement in the slab while it's under down pressure from the router?
A 1/2" overlap should be fine.
 
#24 ·
All is flat, straight, level, and smooth. I will check to make sure the collet is tight and the bit isnt actually creeping. But my feeling is that maybe the long 1/4 shank is not staying straight when it hits some resistance, causing the shank to not be at a 90 to the piece, and therefor having the cutting edge dip a little. Just a thought but not sure what else could explain this.
 
#26 ·
But my feeling is that maybe the long 1/4 shank is not staying straight when it hits some resistance, causing the shank to not be at a 90 to the piece, and therefor having the cutting edge dip a little.
1/2" shanks are recommended for large bits and heavy use. I know you already have $$ in that bit, but if you can't get good results by taking off less per pass I think that slab is worth trying a different bit. I'm thinking of getting one of these:
 
#25 ·
You can verify by going back to the first area you surfaced with the bit. If it cuts the area you already surfaced then the bit is slipping. If it doesn't then it's something else
 
#29 · (Edited)
. But my feeling is that maybe the long 1/4 shank is not staying straight when it hits some resistance
Most likely that is the issue.
Makes one wonder why they would even make that size bit with a 1/4" shank ... OH it's about the yen? money?
I think that slab is worth trying a different bit.
Yep!
 
#30 · (Edited)
I think i see the pattern. As I moved the sled up for each pass, the rear was consistently ~1/32 deeper. So however it happened, the router must have been ever so slightly angled backward. Strange becaus everything was flat square and straight. I figure a shim under the router, between the router and the larger base, maybe just a piece of masking tape or two would do the trick..

would have done the trick.

On the last pass, i hit some kind of resistance and the shaft bent so its junk now.

i wish someone would have recommended a 1/2 shaft.

anyway, i did enough passes that i got rid of the cupping. From this point I think I can finish up with a hand plane.
 
#35 ·
Probably time to keep my eyes open for a 1/2”

i used a cheap Ryobi table saw for 20 years. Until I burnt the motor and replaced it with a Craftsman 113x with cast iron top, Beisemeyer fence and 3hp motor (that I just switched to 220), I honestly had no idea what a world of difference a decent tool makes.

im guessing Id see the same thing with a better router.
 
#36 ·
Probably time to keep my eyes open for a 1/2”
👍 you’re progressing to the point you’re gonna need a bigger one.

If I could make a suggestion, a good first choice would be a Triton. You don’t need the TRA001 it’s a beast and not well suited to hand held work. But the smaller Triton would be the one to look at. They are made for router tables. One of the nice features is the collet goes all the way up to enable above table bit changes.
 
#37 ·
One compliment you should get is that you are using a square, non-movable base in the rails. This prevents any kind of lateral movement. One thing it doesn't fix is the downward pressure you may be applying at different angles. You have to be consistent all the way through each pass. As noted, if you control all the human aspects, and still have issues, it could be in the alignment of the fixture. Square plates are very handy to have around in different sizes.
 
#39 ·
FWIW, I can change the bits in my JessEm lifts above the table very easily. Most lifts if not all, should allow this capability.
I use the off set collet wrenches to get down about 3/4" below the table's surface.
 
#40 ·
I think you figured out issue and you’ve get it going now, but I had some thoughts. 🤔🤔. It looks like you have the guide rails resting on top of your bench. That could potentially be an issue and could cause the bit to travel in a way that will leave uneven marks.

The guide rails have to be absolutely flat (jointed) and coplanar. I’ve only done it to flatten a workbench top. I clamped jointed 2x6’s and used a string corner to corner. Measuring off a surface won’t do it unless it’s perfectly flat.

The other thing is someone mentioned pushing on the track as you route. Even that angle iron will flex, and if you’re using a heavier router, it’s more to consider. Check that. I built a 3 sided box for the router to slide in with double layers of 3/4 ply for the sides.

No super important, just to consider. Thru experience, I’ve found there’s flat and then there‘s flat……..like there’s straight and there’s straight. Add the word “enough” and you’re a woodworker, not a wood machinist. 🤣🤣
 
#41 ·
On the rails, they are directly on the table but screwed to it of course. Pieces of 2x4 are screwed to the bench, and the plywood rails are screwed to the 2x4s. I know the table isnt level, but I did make sure both rails are, each one separately across the length, as well together across their span (at all points along the way). And the workpiece was secured to the table in a similar way with shims.

the plywood rails werent jointer, but came right from the table saw and definitely were flat.

as for the sled, a couple of issues. Yes there was even flex in the angle iron. That surprised me tbh. So definitely introduced the potential for user error. And honestly, I cant be sure I kept constant even pressure. It wasnt easy to keep enough presssure to keep she bit in contact with the wood, but not too much where the sled flexed.

the sled and rails were all so flat straiight and strong, I expected that it would be effortless… just slide the router across and presto

i guess the three sides box would have no flex? I know when i tiled my kitchen, we strengthened the floor joists from below by sistering each one with plywood. Havent had a cracked tile yet and its been 20 yrs, even with my daintiness standing on top, so I guess no flex. I thought the thing with “iron” in the name would be pretty inflexible.
 
#43 ·
Picked up a Bosch 1617evs with the plunge base from CL, in the box. seal never broken, $150. Not a bad deal.

So i guess ill switch to a three sided plywood box and give the router sled another try

since Ill be looking for a 1/2 shaft now, would you still recommend avoiding a 2” planer bit and go with a 1”? Or with the bigger shaft should that not be an issue?
 
#45 ·