Woodworking Talk banner
21 - 40 of 45 Posts
Discussion starter · #21 ·
Bob, Thanks very much for your extensive reply. I'll take your advice and work with the wheels that are already installed on the grinder, at least until I have a much better grip on technique and wheel maintenance. I'm going to lay in the accessories you mention and see what I can do with them. I'll report back - either progress or a cry for more help!

As I understand what you recommend, in the process of sharpening I should use the machine to establish a square edge and eliminate chips, then switch to stones. Should I set the tool rest for the bevel angle for the particular tool? e.g. 25 degrees for a low-angle block plane? I would guess so, but thought I'd better ask.

Best,
Bill

PS I've got some old tools from the bottom of Dad's barrel that I'm going to work with before I risk my small inventory of good stuff!
 
You understand it correctly about shaping on the grinder. It will take all day shaping with stones. I just checked tool pressure by pressing down on a postal scale. Wheel pressure should be about 1 ounce. Very light. As to angle, whatever looks about right will work. Once the edge has its burr off and honed sharp, the exact angle is not all that important. Hair shaving sharp is what you want, obviously. Initial shaping of a beater chisel or abused hand plane iron will seemingly take forever but it won't. Time it and you'll see. Once you've got the shape on an edge, restoring it generally takes just a few minutes.

https://www.woodworkingtalk.com/attachment.php?attachmentid=390485&thumb=1

A piece of 1/4 ply works good at keeping an index of tool rest to wheel ratio.

https://www.woodworkingtalk.com/attachment.php?attachmentid=390487&thumb=1

Kipp handles and custom made tool rest holders (from angle iron) on a 7" grinder showing what a good rest for chisels would be.

https://www.woodworkingtalk.com/attachment.php?attachmentid=390491&thumb=1
Magnifying glass mounted on the eye shield to better see the work area when a NortonA60OBNA2 toolroom cut-off wheel is being used.
https://www.woodworkingtalk.com/attachment.php?attachmentid=390489&thumb=1
Making your own brad point bit from metal working drill bits.
https://www.woodworkingtalk.com/attachment.php?attachmentid=390493&thumb=1
Another shot of the A60OBNA2 wheel grinding brad point bits

https://www.woodworkingtalk.com/attachment.php?attachmentid=390497&thumb=1

Tricked out Baldor 612. Its such a good little 6" grinder that it is worthy of this extra effort.

https://www.woodworkingtalk.com/attachment.php?attachmentid=390495&thumb=1

The back of the grinder enclosure showing a receptacle for a work light.
 

Attachments

Here is an old trick that works fine. Leave the motor at 3600 rpms. Turn the grinder on and let it come up to full speed.
Now turn the grinder off and start grinding your tool. When the wheel stops, look at the grind, you may be surprised.
If the grind needs more work, repeat the process.
About 50 years ago I stumbled on to this trick when the electric went off during a storm. I was grinding a roughing gouge and always had problems grinding a single facet. Mostly hit and miss back then. When the electric came back on I looked at the gouge and the grind was perfect. I thought it was dumb luck but decided to try grinding other lathe tools.
Every tool I ground came out either perfect or nearly so. Then tried plane irons and chisels. Spent several hours sharpening every tool that needed it. I can't explain why, maybe because the grind is better controlled.
It works, that's what is important.
mike
 
Discussion starter · #26 ·
Bob, I tried a magnet on the wheel guards and they are definitely magnetic, as are the other painted parts. I know heat-treating has come a long way and the aluminum tables on my little suitcase planer and Toshiba miter saw seem reasonably stout, you just can't been cast iron for vibration dampening.

Bill
 
As I said, your grinder is cast iron and a good quality USA-made cast iron to boot, not Asian peanut butter iron.
A lot of the cheapie grinders these days have stamped steel inside and outside guards that seem to be rejects from a low-end frying pan factory.
You've got an industrial quality grinder that will never be made again.
 
Hi


If your looking for a grinder that you can control the speed on, then try looking for a older belt driven grinder and use a DC Motor out of a treadmill and a AC Speed-controller. You can get those DC motors down to some pretty low RPM's.
 
Discussion starter · #29 ·
Vaughan has shown me the Way

Hi


If your looking for a grinder that you can control the speed on, then try looking for a older belt driven grinder and use a DC Motor out of a treadmill and a AC Speed-controller. You can get those DC motors down to some pretty low RPM's.
Thanks for your suggestion and that certainly would be a feasible project. However, in response to my original post, @member Bob Vaughan graciously has taken a considerable amount of his time to provide me with know-how and show-how; hopefully so I can learn to properly use Dad's old grinder to reshape blades for sharpening without drawing their temper. He has put up a very useful series of photos of re-worked tool rests and guards to aid in the task. And he has pointed me to some maintenance tools needed to prep the existing wheels on my machine to do good work. Armed with these lessons, I'm encouraged enough to give my machine a good trial with some old worn chisels and plane blades Dad left lying around - although not the good stuff, at least not yet.

I'll report back how it works out.

Bill
 
Discussion starter · #30 ·
The below photos are from a 2004 catalog so the prices will be a little different but not a whole lot. There’s no need to spend a pile on the diamond dresser.
Bob, I've ordered the Desmond star dresser you recommended. MSC carries it and they've been reliable. There has been a little inflation - twenty bucks instead of twelve. I tried at first to include a diamond dresser in the order. However, none of the single point tools MSC listed (that I could find) had handles on them. I wound up buying a "shop grade" quarter-carat dresser on an 8" shank and plastic handle, from Penn Tool Co. for about $28.

Big Brown is supposed to get them here in about a week. I look forward to trying them out and I've already figured out to do this on my driveway with a mask, to avoid adverse comment from the War Department.
 
Looking at your original wheels, they are going to take some time to get that layer of aluminum out and some of the other contaminates. Doing this outdoors is excellent strategy. Once the wheels are clean, the occasions you'll use the star dresser won't make such a big mess. As I said, for routine sharpening of the wheel's surface, you'll only push the star dresser into the spinning wheel for about five seconds and then you're done.

Consider making your own grinder stand. Its a fun little workshop project that can have great storage benefits and a good way to use up wood that wouldn't be of a grade that quite fits in a nice piece of furniture. Side hung drawers are very efficient. I like 5/8" thickness for the sides and backs. Having the grinder stand on casters makes things easy to move around and it keeps your bench uncluttered for larger projects.

Some examples of stands I've done for various grinders I've got:
 

Attachments

Discussion starter · #32 ·
Everything has to be on casters

Bob, I particularly like the touch of the tray mounted above the motor and between the wheel guards. Is it secured to the motor case or the table top?

As you can see from the attached photos of my garage "shop", everything HAS to be on casters unless it's hung on the wall; and I'm running out of wall space so, in order to be accessible and useful, the little Baldor grinder will need to have it's own rolling stand. What is not shown in the photos is the 800 board feet of rough white oak in what was once a car bay. That subject is a little touchy around my house - particularly since another thing not shown is the motorcycle still parked in the garage...

I'm going to need to build something like what you've illustrated. I believe I've even got a set of casters suited to the job. I'd assume from the working height of the stand that you either have weights in the bottom drawer or don't put large sideways forces on the machine while in use? The wheelbase doesn't look very long in relation to the table height. I need a fairly high working height myself, so will build one similar.

Dad did a pretty fair amount of metal work with this grinder, although he also used an old Craftsman narrow-belt vertical sander for similar purposes. He had several different gas welding rigs in addition to his big arc welder, a pre-1940 Southbend lathe and an Enco drill/mill (which latter he cursed regularly for its sloppy build). Along with a supply of exotic metal stock that had somehow stuck to him (as a retirement gift from colleagues) when he retired from Shell Oil. I can't imagine what all residue is on the grinder wheels. To give a small example: A machinist friend and fellow employee gave Dad and Mother a beautiful barbeque grill made of high-grade stainless steel, the firebox having been insulated with "spare" tiles of hybrid metal from a run made for the re-entry nose cone of an early NASA space vehicle. (He later found out the material was considered carcinogenic and disposed of it.)
 

Attachments

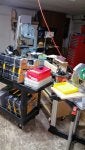
It looks like your shop is coming along pretty good and you’ve got most of the things needed. That’s a great story about the nose cone materials used in the making of the barbeque grill.

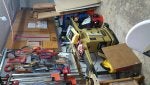
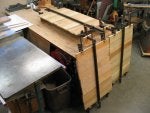
I, too, have disrupted domestic tranquility with storage of a big lumber buy that was too good to pass up. Twice I had piles of lumber that stayed on our covered back porch until I had room to store things in my lumber storage areas. It took several years to accomplish this. The drawer cabinet base will be a good opportunity for you to use up some of that lumber that may not be of a quality level suitable for fine furniture. Drawer sides and backs are real lumber alligators. I’ll joint and glue up wide panels and then rip the drawer sides out of that. I’ll start with 4/4 lumber, face flatten, skip dress, and joint the edges. Once the drawer sides are roughly ripped out, back to the jointer for finish flattening and then to the planer for final dressing to 5/8” thickness. The relatively short lengths makes good use of wood that may be twisted or bowed too much for longer parts.

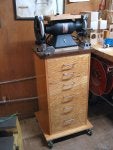
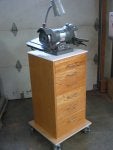
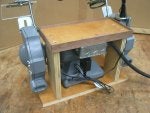
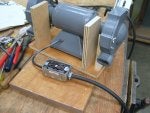
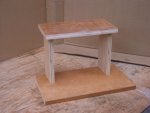
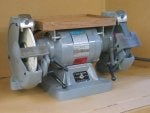
The grinder drawer stand is pretty heavy and won’t move against pressure put against the grinder when grinding. If it does, you’re putting way too much pressure against the wheel and will burn the steel. On many of my stands, the grinder is screwed to the top. There’s a ¾” space left between the top of the top drawer and the bottom of the top to allow clearance for the bolts. That can be seen on one of the photos shown above. You’re essentially building a casual lingerie type drawer cabinet. Its good practice. I’ll use an easier to make locking joint on the drawers rather than dovetails. The sides and back of my cabinets are made of ¾” plywood, either birch or oak veneer. Having a back of ¾” plywood is crucial to squareness and stability. The cabinet is set on a floor float that has casters placed wide enough so that when turned under the cabinet, there won’t be imbalance.

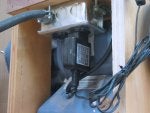
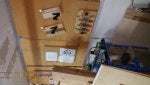
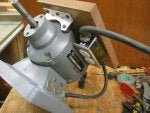
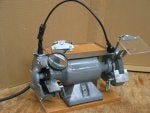
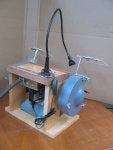
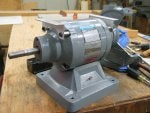
The tray tops on some of the grinders are attached directly to the grinder’s body with an angle piece and stand-off spacers. The original through bolt is discarded and usually replaced with 10-32 all thread long enough to hold things in place. This is possible with the larger grinders with four through bolts. The Baldor 612 only has two through bolts, so this isn’t possible and thus the two upright pieces of plywood behind the grinder. I’ll try to get some photos.

… lots of blather here and lots of thread drift but I’ve nothing more interesting to do this morning.
 

Attachments

It would be a pedestal base.
Baldor makes them. The Baldor GA16 is the cast iron type. The Baldor GA14 is a steel box with shelves. Pricey little devils. The GA14 was the inspiration for my drawer pedestal bases. I'd seen some of them in school shops and noticed that an unbalanced wheel could vibrate things out of the shelf. I figured drawers would be better.
I like the wood pedestal base. The bottom is heavy and that's necessary.
Thank you for the quick response, but I was referring to the "four point" style on the very bottom of @faith michel's base. I wonder whether there is a specific name for that style of bottom on the pedestal base itself?
 
Discussion starter · #39 ·
More photos including a drawer side glue-up.
Bob, thanks for the photos - and the encouragement. I expect I'll have some offcuts from the upstairs project, from which i can construct a base cabinet for the grinder. Things have slowed down for the last week because I dropped a 20' red oak S2S 1x6 board on my left foot, just aft of where the steel toe in the shoe stopped. Next time, wear leather gloves instead of cheap cloth from HD.

PS - something perhaps of modest value to other members: Profit from my experience. Last Saturday I placed a Web order with MSC Direct - good folks - for a star grinder wheel dresser. Then, Sunday, I realized I needed two 303 stainless M6 thumb screws. Back to MSC and placed a separate order. By the time I could get hold of a live person on Monday morning, they'd priced the shipping on the two orders separately and packed them up. To make a long story short, the dresser was only twenty dollars, the two thumb screws were $8.50 each -- about $37 for the actual stuff in both orders-- but the total shipping was SIXTEEN DOLLARS, even after I screamed loud enough to get a four dollar discount. Don't get me wrong - MSC is a blessing because it will sell you one or two pieces of tool parts that you are not going to find locally, for which I'm grateful. Yes, the thumb screws were priced like they were made of Unobtainium but I needed something very specific - exactly 25mm OAL, in a metric thread, a decent sized knurled head, and made of hard stainless steel. (It's for a drill press quill stop/lock mini-project). I needed exactly two - not the 500 the manufacturer likes orders for. The moral to the story is think about what you might need and get it in a single order!

If I don't show some performance on the upstairs paneling and rails and baseboards and window trim soon, I may be sleeping in the garage shop and hot weather is upon us.
 
Thank you for the quick response, but I was referring to the "four point" style on the very bottom of @faith michel's base. I wonder whether there is a specific name for that style of bottom on the pedestal base itself?
I am really so sorry.. I am too late for your question Tool Agnostic.. I am looking online.. but i am not online.. my phone and my computer open 24/7 at this forum... My univercity opened today.. This is first open afther corona pandemic.. My school friends and i studyed lesson allday at school's library.. we come back our normal life with slowly slowly mini steps..
Anyway we call it geometric shapes.. I honestly said. I am an engineer's student.. I hate mathematics..and especiatly geometri..

An arabic scientist El Harezmî – (Ebu Abdullah Muhammed bin Musa el Harezmi) finded this geometric shapes at 16th century. .
Image


SM-J700F cihazımdan Tapatalk kullanılarak gönderildi
 
21 - 40 of 45 Posts