

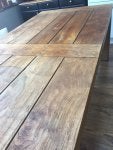
I have picked up a bargain Teak table at my local store and I want to use at my main kitchen dinner table.. that means kids will be eating and crumbs and water spills and all that. Reason was it was a bargain was it was display and had large water marks that I figured I can sand out and refinish. My main problem is with the gaps in between the planks, they are not just groves, they are gaps that stuff will go through ( this didn't occur to me in the store!) . I would like ( if possible ) some recommendation on how I can block off the gaps, but keep the look .. i.e I am not looking to hide the gaps, just fill them in so everything doesn't go down to my kitchen floor! . I have thought about plugging the depth of the gaps with cork mainly and then adding wood filler on top and finishing it off. I have also thought about adding natural rope to fill the gaps and again topping up with filler to make the top smooth and finish it.
Will the PVA + Sanding dust mixture work with the top in the long run? I aim to seal with the Osmo Wood Wax Finish Clear Extra Thin after sanding down with 120/150 grit eventually, will this mixture take the darkening / staining that the finishing will bring to the table the same way as the rest of the table?
Is this even possible? please help!


") I am self taught and in the past ripped out carpets and taken years of paint from my stairs and refinished those to an acceptable stand (to me of course).
I am self taught and in the past ripped out carpets and taken years of paint from my stairs and refinished those to an acceptable stand (to me of course). 


